If you are finding it hard to understand, follow and complete the Abyssal Expedition (ABEX) – Vault of Time, this guide is for you. We will be going from the most basic tips through advanced tricks to help you easily defeat the final boss, get to rank Prince and grab a ton of rewards.
During this event, you join a special journey with your Guild friends to fight against a lot of enemies & their bosses on a huge open map in 14 days.
Let’s start the journey!


The guide is written and shared by AFKArty & whitesushii.
Quick Abyssal Expedition Guide (Updated)
Vault of Time Map

- Abyssal Expedition can be found in the Dark Forest tab in the bottom left, as pictured below.
- You must be over stage 15-40 to participate.
- This event is a cooperative where you join the fights with a lot of players to beat the final bosses.
- It lasts for 15 days.
Note: The event features 70 Players, the same as a max level guild. Players in the same guild who enroll will always be together and vacancies will include those from other guilds until a number. You can participate even if not in a guild, you will just be randomly allocated to a “militia”.
Important Tips for Beginners
- If you are still a new player with very few ascended heroes, it is recommended to be a Spectator (see Star of Dawn section for more info).
- It is also highly recommended to choose Honorary instead of Casual expedition if you’re planning to collect all rewards. Casual expedition has many more inactive players, so it is almost impossible to reach Prince rank.
- Save Stamina by pathing with 1-3 heroes instead of a full team when facing weak enemies.
- Try to obtain 3 stars from fights as that will refund you 6 stamina.
- Do not use x4 Battle Speed because you could lose the battle in a blink of an eye and cost you a lot of Stamina. In ABEX, Stamina is everything.
- When attacking any boss, get a plant tile next to the boss and “settle” for a damage bonus.
- Do not attack first boss right away. Generally, you only want to attack it on the 2nd day. Attack the boss only when you have a strong enough team to do so.
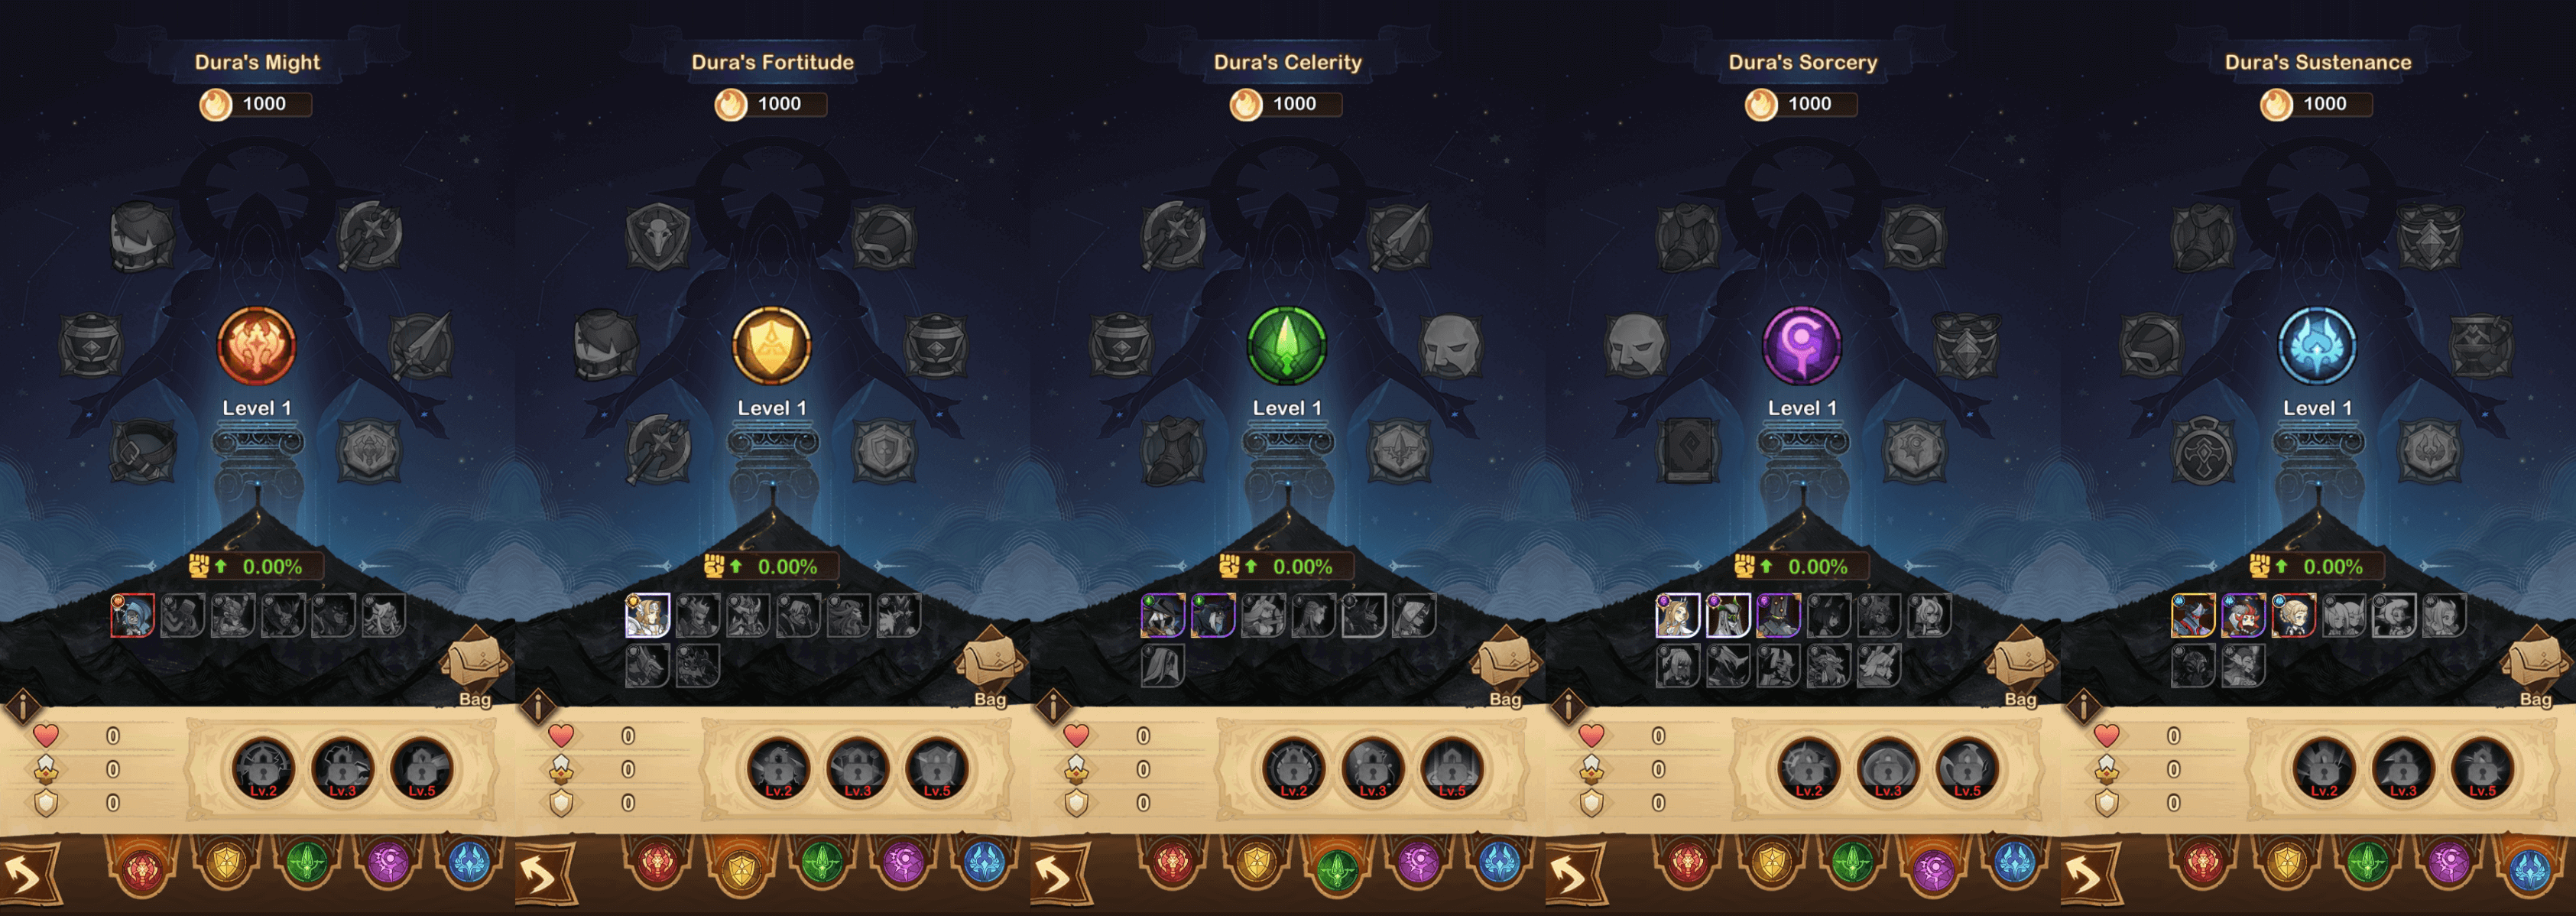
- Focus on only one relic tree until at least Relic level 4.2. Celerity is the best and easiest class for most players, especially beginners. More advanced players might prefer Tank or Warrior class.
- When you get new hero slots, unslot your strongest heroes (once they are out of stamina) and place them into the new slots for an instant 60 stamina.
- Avoid wasting stamina on cursed tiles unless you know you can win.
- Avoid tiles with tough enemies (see more below).
- Abandon and re-take tiles to complete quests if there aren’t enough.
- You can abandon and re-take tiles to complete quests but this is only recommended on the last day.
- Work together with Militia mates and take down higher tier cities together.
- While pathing, abandon tiles you move off from to save settlement slots.
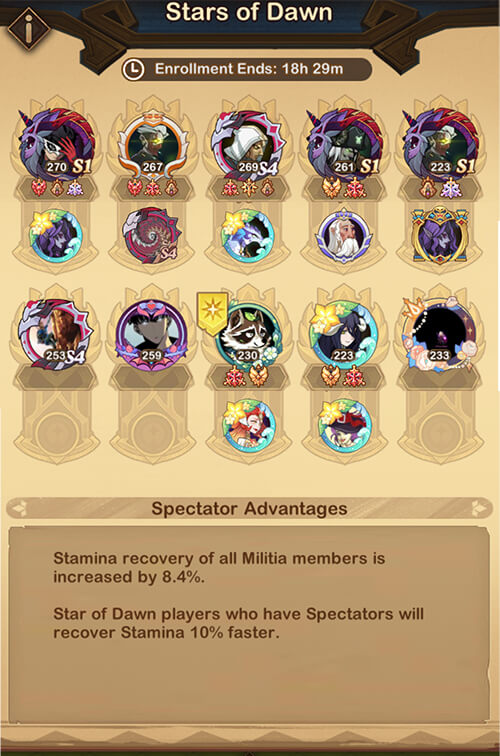
Star of Dawn
- The 10 players with the highest Combat Ratings will be displayed as Stars of Dawn. Each Star of Dawn player can be spectated by 1 other Militia member.
- All militia members may apply to become spectators.
- Spectators may only apply after enrollment ends and within the first 24 hours from when battles commence.
- Spectators cannot participate in battles, but can still receive rewards. Title rewards will become available for spectators when the Star of Dawn player they are supporting levels up.
- Each Spectator boosts overall Stamina Recover Rate for Militia members by 1.2%
- Each Spectator gives their Star of Dawn player 10% Stamina Recovery Rate.
Starting: Heroes to Bring
At the beginning of Abyssal Expedition, you get placed on a massive map along with all 70 players and are asked to add a selection of 10 heroes to your pool.
Try to start the journey as fast as you can to earn more ![]() Essence! The event starts at daily reset 00:00 GMT +0. In the latest update, plaint tiles do not produce
Essence! The event starts at daily reset 00:00 GMT +0. In the latest update, plaint tiles do not produce ![]() for up to 4 hours after the battle phase has started, so your main priority is to get as many settlements (villages) as you can during the first hours.
for up to 4 hours after the battle phase has started, so your main priority is to get as many settlements (villages) as you can during the first hours.
Do note that hero slots do not regenerate ![]() Stamina during the first 4 hours of the ABEX. During this time, you want to start with 4-5 of your strongest Heroes and switch them to the other slots when they are out of Stamina.
Stamina during the first 4 hours of the ABEX. During this time, you want to start with 4-5 of your strongest Heroes and switch them to the other slots when they are out of Stamina.
Unless you don’t have any strong ![]() Ranger carry, focus only on upgrading
Ranger carry, focus only on upgrading ![]() Celerity Relic Tree at the beginning as it gives the highest chance of getting 3-star wins during the first days.
Celerity Relic Tree at the beginning as it gives the highest chance of getting 3-star wins during the first days. ![]() Awakened Thane,
Awakened Thane, ![]() Awakened Baden,
Awakened Baden, ![]() Awakened Lyca,
Awakened Lyca, ![]() Lucretia,
Lucretia, ![]() Mulan,
Mulan, ![]() Eironn,
Eironn, ![]() Raku,
Raku, ![]() Athalia,
Athalia, ![]() Eorin,
Eorin, ![]() Crassio,
Crassio, ![]() Olgath are the best carries from Ranger class.
Olgath are the best carries from Ranger class. ![]() Kren,
Kren, ![]() Drez,
Drez, ![]() Treznor,
Treznor, ![]() Audrae are also good options if you have them ascended.
Audrae are also good options if you have them ascended. ![]() Lyca and
Lyca and ![]() Cecilia are very useful even at Elite+ ascension. Try to bring some of those heroes we just mentioned.
Cecilia are very useful even at Elite+ ascension. Try to bring some of those heroes we just mentioned.
If you do not have a decent Ranger team, you can focus on ![]() Sorcery Relic Tree if you have
Sorcery Relic Tree if you have ![]() Scarlet,
Scarlet, ![]() Ainz,
Ainz, ![]() Emilia, or
Emilia, or ![]() Daemia ascended and
Daemia ascended and ![]() Awakened Belinda at any ascension.
Awakened Belinda at any ascension.

More advanced players may prefer to focus on ![]() Might Relic Tree or
Might Relic Tree or ![]() Fortitude Relic Tree. You can choose Warriors if you have
Fortitude Relic Tree. You can choose Warriors if you have ![]() Awakened Brutus,
Awakened Brutus, ![]() Anasta,
Anasta, ![]() Rem,
Rem, ![]() Awakened Athalia,
Awakened Athalia, ![]() Zolrath,
Zolrath, ![]() Alna,
Alna, ![]() Antandra, and
Antandra, and ![]() Izold.
Izold. ![]() Estrilda,
Estrilda, ![]() Warek, and
Warek, and ![]() Jerome are great buffers. You can choose Tanks as your main class if you have
Jerome are great buffers. You can choose Tanks as your main class if you have ![]() Grezhul,
Grezhul, ![]() Mishka,
Mishka, ![]() Daimon,
Daimon, ![]() Veithael,
Veithael, ![]() Canisa & Ruke, and
Canisa & Ruke, and ![]() Naroko.
Naroko. ![]() Hodgkin,
Hodgkin, ![]() Awakened Talene, and
Awakened Talene, and ![]() Albedo are also useful.
Albedo are also useful.
In addition to focusing on one class as your main class, you should also bring some heroes from ![]() Sustenance class to help your main class carries.
Sustenance class to help your main class carries. ![]() Liberta is one of the best damage dealers in the game.
Liberta is one of the best damage dealers in the game. ![]() Ivan,
Ivan, ![]() Awakened Safiya,
Awakened Safiya, ![]() Palmer,
Palmer, ![]() Mortas,
Mortas, ![]() Elijah & Lailah are the best buffers.
Elijah & Lailah are the best buffers. ![]() Awakened Solise,
Awakened Solise, ![]() Silas and
Silas and ![]() Nevanthi are the best healers.
Nevanthi are the best healers.
Alna-ABrutus, Alna-AAthalia and Alna-Rem are the best duos to use at the beginning to clear strong villages. Alna must have level 9 furniture and signature level 30 to be great.
Also try to use 1-2 heroes for plain or weak tiles to save Energy and earn 3-star wins!
Above are some suggestions but feel free to run whatever is the best for you (generally campaign lineups).
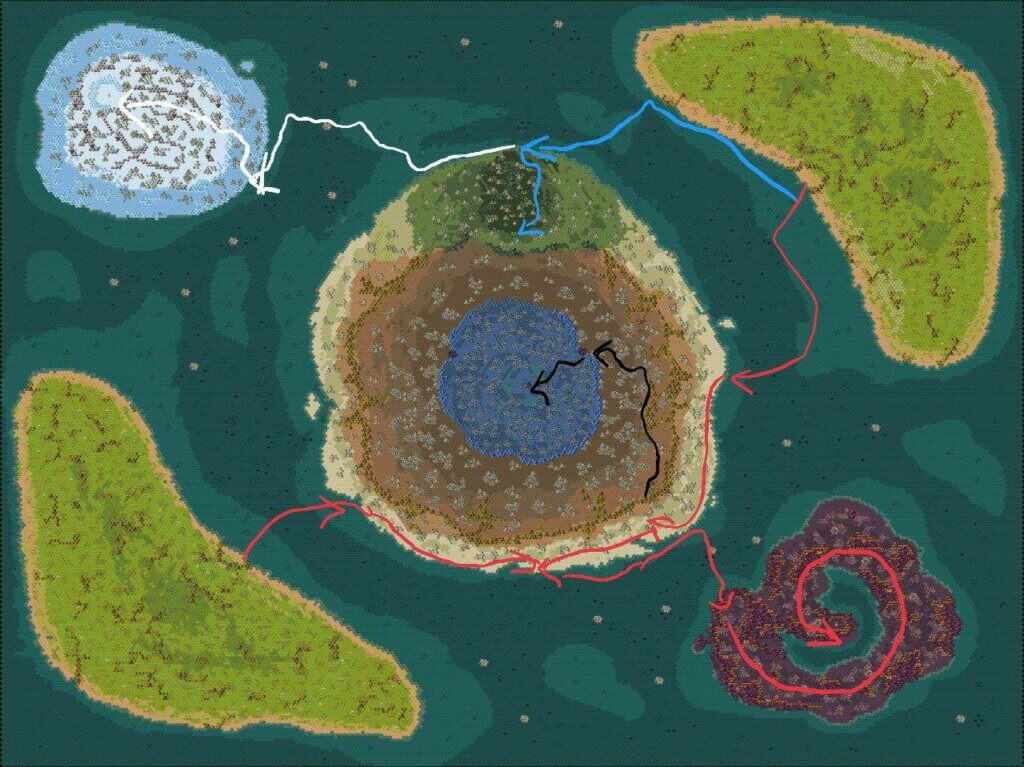
Obtain tiles as fast as you can, connect your tiles with nearby friends and go towards the nearest boss using the path from the map above!
 Plant Tile |
Super easy to capture. Use Lucretia or strong pathing heroes as mentioned above (normally 1-2 heroes are enough). |
 Village 1 |
Quite easy to capture. Use 2-3 heroes, or more if required. |
 Village 2 |
A bit harder to capture, but you still can capture it on the first day. Using 2-3 heroes is enough. |
 Village 3 |
Hard. Using 3-4 heroes if required, or even 5. If you are not strong enough, leave it for the next day. Remember to use manual mode! |
 Town 1 |
Most players cannot capture this on the first day. Just don’t attempt to take this one, try later on the second day. |
It is important to mention that an elite hero with upgraded relics on Abyssal Expedition is way stronger than an ascended hero without upgraded relics, that’s why you should focus on using only one class as your main class.
If you choose Celerity class as your main class. Pick your strongest Celerity ones on this list:
![]()
![]()
![]()
![]()
![]()
![]()
![]()
![]()
![]() are usually the strongest damage dealers from Celerity class against bosses.
are usually the strongest damage dealers from Celerity class against bosses.
![]()
![]()
![]()
![]()
![]()
![]()
![]()
![]() are also pretty useful against bosses, but some of them require a good investment.
are also pretty useful against bosses, but some of them require a good investment.
![]()
![]()
![]()
![]() are not good against bosses, but they’re good at solo taking cities.
are not good against bosses, but they’re good at solo taking cities.
![]()
![]()
![]()
![]()
![]()
![]() are a few other options that you can use.
are a few other options that you can use.
And use ![]() Soul Relic for non-Celerity heroes.
Soul Relic for non-Celerity heroes.
You can use Tanks+Supports or Warriors+Supports instead of Celerity+Supports, but this is not recommended for players without a very strong hero pool. You can also try Mages+Supports, but Mage is significantly weaker than Rangers, Warriors and Tanks on this event.
![]() When Get To Rank Baron
When Get To Rank Baron
Slot heroes that will be useful for you against bosses. Even tough you’re using Celerity as your main faction, there are many non-Celerity heroes that will be very useful for you against bosses. Here are some examples:
Supports: ![]()
![]()
![]()
![]()
![]()
![]()
![]() are the best ones for bosses, but
are the best ones for bosses, but ![]()
![]()
![]()
![]()
![]()
![]()
![]()
![]() can also be great options.
can also be great options.
Warriors: ![]()
![]()
![]()
![]()
![]()
![]() are the best for bosses,
are the best for bosses, ![]()
![]()
![]()
![]()
![]()
![]() are also great options.
are also great options. ![]()
![]()
![]()
![]()
![]() can be useful if you’re using Warriors instead of Rangers as your main class.
can be useful if you’re using Warriors instead of Rangers as your main class.
Tanks: ![]()
![]()
![]() are the most important ones.
are the most important ones. ![]()
![]()
![]()
![]() are also great options.
are also great options. ![]()
![]()
![]()
![]()
![]()
![]() can be useful too, especially if Tank is your main class.
can be useful too, especially if Tank is your main class.
Mages: ![]() is the strongest Abyssal Expedition damage dealer, you can use Soul Relic on her if you have her and she does a great job even at Legendary ascension.
is the strongest Abyssal Expedition damage dealer, you can use Soul Relic on her if you have her and she does a great job even at Legendary ascension. ![]()
![]()
![]()
![]() are also pretty good against bosses, so you can use them too if you want. But do not use Mage as your main class.
are also pretty good against bosses, so you can use them too if you want. But do not use Mage as your main class.
![]() When Get To Rank Marquis
When Get To Rank Marquis
Once you reach this Rank, you can slot other heroes that will be useful on the final boss.
![]() When Get To Rank Duke
When Get To Rank Duke
Slot more boss’s heroes.
The above hero list is only for Vault of Time – Abyssal Expedition! For the general hero ranking, please take a look at AFK Arena Tier List.
Tough Enemies (Avoid them in most cases)
Avoid battles that have the following enemies:
![]()
![]()
![]()
![]()
![]()
![]()
Getting Stronger
Focus all your essence on a single relic tree depending now at setup you are going and only invest in other trees where necessary (rank promotion quest).
Generally, prioritize attack relics but for later relic levels, getting 2 cheap relics (with some luck from drops) would usually outweigh getting a single relic.
Win Fights
Stamina is required to initiate a fight and the amount depends on if the fight is a regular tile or a boss. In general, regular tiles take 12 stamina per attack. The player generates a fixed 4 food per hour which is 96 food every day or 8-16 battles depending on bonuses.
- Win Fight (+2 Stamina)
- No Heroes Lost (+2 Stamina)
- Win Within 30s (+2 Stamina)
Since losing a fight consumes 12 stamina while retrying only takes 1 (again for regular tiles), it’s sometimes better to play on slower speeds so you can quit/retry before your team gets wiped!
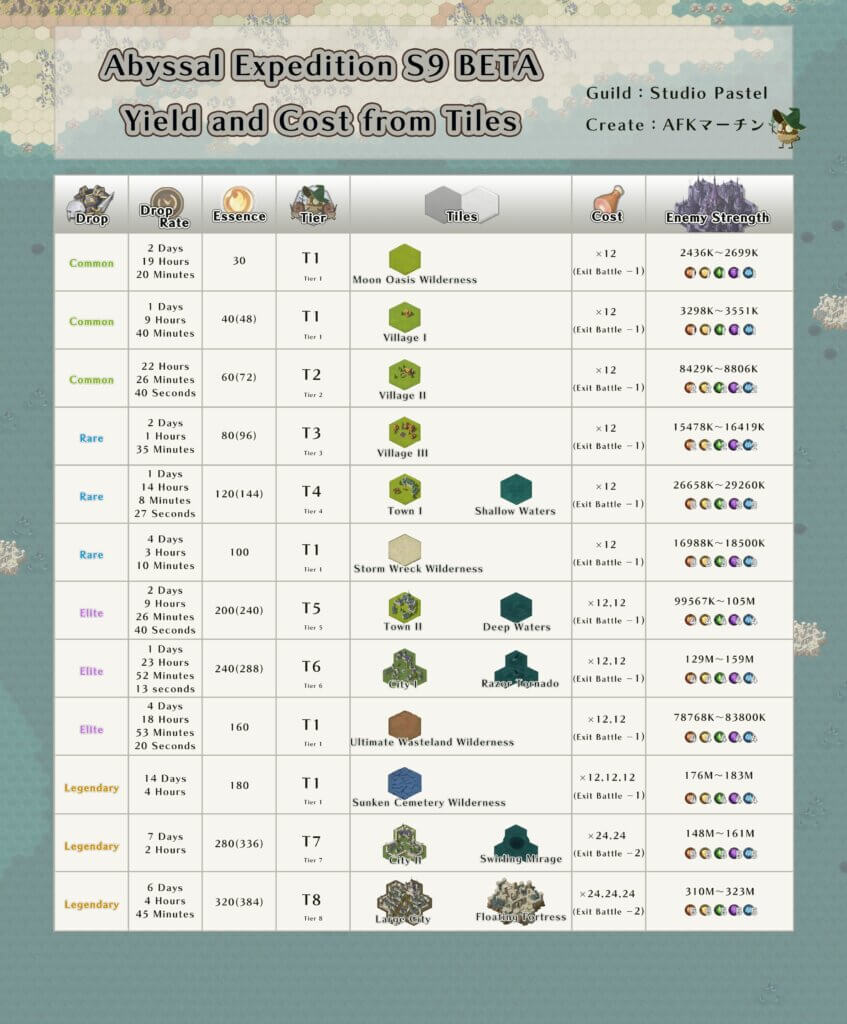
Some tiles cost more stamina than others and Abyssal Expedition Season 9 has introduced new tiles. Here is the complete guide for tiles:
How to defeat Abyssal Expedition Bosses?
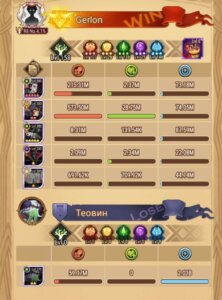
Boss 1: 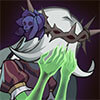 Theowyn
She is the first boss of the current Abyssal Expedition season. Attack her when you get your main class to level 3.
![]() Awakened Belinda can one shot this boss easily.
Awakened Belinda can one shot this boss easily. ![]() Palmer is the best support to help her.
Palmer is the best support to help her. ![]() Estrilda,
Estrilda, ![]() Rosaline,
Rosaline, ![]() Grezhul,
Grezhul, ![]() Mishka,
Mishka, ![]() Elijah & Lailah,
Elijah & Lailah, ![]() Mortas,
Mortas, ![]() Raine,
Raine, ![]() Saurus,
Saurus, ![]() Hodgkin,
Hodgkin, ![]() Awakened Solise,
Awakened Solise, ![]() Silas,
Silas, ![]() Veithael,
Veithael, ![]() Warek are also great options. Choose Awakened Belinda and four of those heroes mentioned above and you will probably one shot Theowyn.
Warek are also great options. Choose Awakened Belinda and four of those heroes mentioned above and you will probably one shot Theowyn.
![]() Anasta is arguably the second best damage dealer against this boss. She can also one shot this boss. Use her with four of those heroes mentioned above.
Anasta is arguably the second best damage dealer against this boss. She can also one shot this boss. Use her with four of those heroes mentioned above.
![]() Awakened Brutus,
Awakened Brutus, ![]() Rem,
Rem, ![]() Antandra,
Antandra, ![]() Zolrath, and
Zolrath, and ![]() Izold are also great damage dealers if you’re using Warrior class.
Izold are also great damage dealers if you’re using Warrior class.
If you’re using Celerity class, use ![]() Lucretia,
Lucretia, ![]() Drez,
Drez, ![]() Eironn,
Eironn, ![]() Raku,
Raku, ![]() Awakened Baden, or
Awakened Baden, or ![]() Awakened Thane as your main carry against Theowyn.
Awakened Thane as your main carry against Theowyn. ![]() Cecilia,
Cecilia, ![]() Lyca,
Lyca, ![]() Athalia are also pretty decent celerity heroes against her.
Athalia are also pretty decent celerity heroes against her.
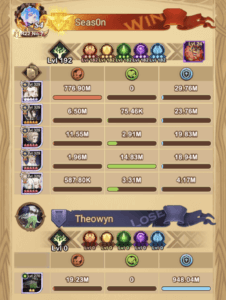
Here are two examples of Awakened Belinda and Anasta comps one-shotting Theowyn:
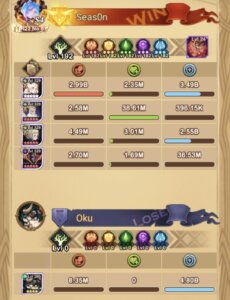
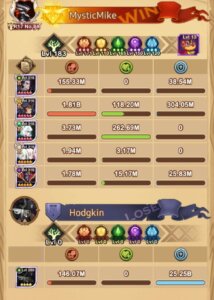
Boss 2:  Hodgkin (left side) and
  Oku (right side)
Hodgkin and Oku are the second bosses of the current Abyssal Expedition season. At this point, you should have gathered members from both sides of the map and activated the three beacons scattered around the map.
The strategy is the same as Theowyn’s strategy. Just use ![]() Awakened Belinda to one shot them.
Awakened Belinda to one shot them. ![]() Anasta is the second best damage dealer. Awakened Belinda is stronger against Oku. Anasta is stronger against Hodgkin.
Anasta is the second best damage dealer. Awakened Belinda is stronger against Oku. Anasta is stronger against Hodgkin.
You don’t need to attack both bosses. You can focus on only one of them if you want.
Here are two examples of Awakened Belinda and Anasta comps doing great damage against the second bosses:
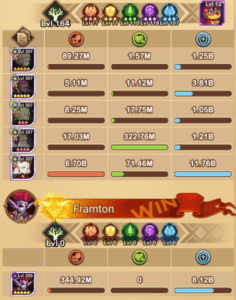
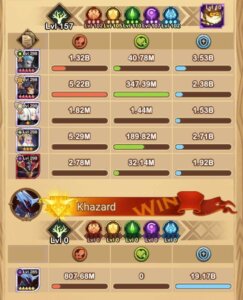
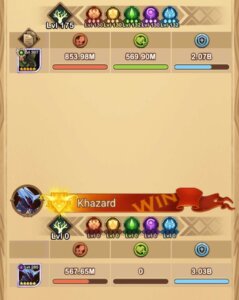
Boss 3:  Framton (left side) and
  Khazard (right side)
And again, the best damage dealer is ![]() Awakened Belinda and the second best damage dealer is
Awakened Belinda and the second best damage dealer is ![]() Anasta. The meta is still the same. But it is also important to mention that
Anasta. The meta is still the same. But it is also important to mention that ![]() Izold is incredibly good as a solo damage dealer (especially against Khazard) if you wanna save stamina of your main heroes.
Izold is incredibly good as a solo damage dealer (especially against Khazard) if you wanna save stamina of your main heroes.
Here are some examples of Awakened Belinda, Anasta and Izold doing great damage against the third bosses:
Final Boss
There are hundreds of different comps that can work well enough for you to complete the final mission. The most important thing is knowing which are the best heroes against ABEX bosses.
![]() Grezhul is one of the best heroes to buff you carry’s damage and he also deals a good amount of damage.
Grezhul is one of the best heroes to buff you carry’s damage and he also deals a good amount of damage. ![]() Palmer,
Palmer, ![]() Estrilda,
Estrilda, ![]() Elijah & Lailah,
Elijah & Lailah, ![]() Mortas,
Mortas, ![]() Raine are also top-tier heroes to buff you carry’s damage.
Raine are also top-tier heroes to buff you carry’s damage. ![]() Rosaline,
Rosaline, ![]() Warek,
Warek, ![]() Hodgkin,
Hodgkin, ![]() Silas are also great heroes that can buff your carry’s damage.
Silas are also great heroes that can buff your carry’s damage. ![]() Awakened Solise deals a great amount of damage and it is the greatest healer in the game.
Awakened Solise deals a great amount of damage and it is the greatest healer in the game.
![]() Nevanthi,
Nevanthi, ![]() Haelus,
Haelus, ![]() Joan of Arc can also be useful.
Joan of Arc can also be useful. ![]() Rowan,
Rowan, ![]() Talene,
Talene, ![]() Merlin are decent supports that you could use too, but they’re definitely way less effective than the other options mentioned above.
Merlin are decent supports that you could use too, but they’re definitely way less effective than the other options mentioned above.
![]() Awakened Belinda is undoubtedly the best damage dealer. Use Soul Relic on her and choose four of those heroes mentioned above (preferably Grezhul + three of those heroes mentioned on the second paragraph of this section) and you will deal a huge amount of damage easily. She can work even at Legendary ascension.
Awakened Belinda is undoubtedly the best damage dealer. Use Soul Relic on her and choose four of those heroes mentioned above (preferably Grezhul + three of those heroes mentioned on the second paragraph of this section) and you will deal a huge amount of damage easily. She can work even at Legendary ascension.
If you do not have Awakened Belinda and Warrior is your main class, ![]() Anasta,
Anasta, ![]() Awakened Brutus,
Awakened Brutus, ![]() Rem,
Rem, ![]() Antandra,
Antandra, ![]() Zolrath, and
Zolrath, and ![]() Izold can all work well as your carry.
Izold can all work well as your carry. ![]() Saurus and
Saurus and ![]() Baden are also decent options to help your main carry.
Baden are also decent options to help your main carry.
If Tank is your main class, ![]() Grezhul with
Grezhul with ![]() Mishka and three of those supports/buffers mentioned above should be good enough.
Mishka and three of those supports/buffers mentioned above should be good enough. ![]() Veithael and
Veithael and ![]() Canisa & Ruke can also deal a good amount of damage.
Canisa & Ruke can also deal a good amount of damage.
If Ranger is your main class, ![]() Awakened Thane is the best option, but
Awakened Thane is the best option, but ![]() Lucretia,
Lucretia, ![]() Drez,
Drez, ![]() Eironn,
Eironn, ![]() Raku, or
Raku, or ![]() Awakened Baden should also be good enough.
Awakened Baden should also be good enough. ![]() Cecilia is good to increase your survivability.
Cecilia is good to increase your survivability.
If Mage is your main class and you do not have Awakened Belinda, ![]() Scarlet and
Scarlet and ![]() Maetria are by far your best options.
Maetria are by far your best options. ![]() Ainz is arguably the third best option.
Ainz is arguably the third best option.
Heroes like ![]() Mortas,
Mortas, ![]() Elijah & Lailah,
Elijah & Lailah, ![]() Hodgkin and
Hodgkin and ![]() Warek can work even at Elite+ ascension.
Warek can work even at Elite+ ascension.
If you have not upgraded your Tanks’ relics, it is highly recommended to use Soul Relic on ![]() Grezhul, unless your main damage dealer (e.g Awakened Belinda) also needs the Soul Relic, then it is better to use the Soul Relic on your carry.
Grezhul, unless your main damage dealer (e.g Awakened Belinda) also needs the Soul Relic, then it is better to use the Soul Relic on your carry.
If you follow this guide, you should have no problem being able to complete all of the Abyssal Expedition quests.
Abyssal Expedition Old maps


- Abyssal Expedition can be found in the Dark Forest tab in the bottom left, as pictured below.
- You must be over stage 15-40 to participate.
- This event is a cooperative where you join the fights with a lot of players to beat the final bosses.
- It lasts for 15 days.
Note: The event features 70 Players, the same as a max level guild. Players in the same guild who enroll will always be together and vacancies will include those from other guilds until a number.
You can participate even if not in a guild, you will just be randomly allocated to a “militia”.
Starting Out
At the beginning of Vault of Time, you get placed on a massive map along with all 70 players and are asked to add a selection of 10 heroes to your pool.
Do note that hero slots do not regenerate ![]() Stamina during the first 4 hours of the ABEX. So in the first 4 hours, you want to start with 4-5 of your strongest Heroes, and switch them to the other slots when they are out of Stamina.
Stamina during the first 4 hours of the ABEX. So in the first 4 hours, you want to start with 4-5 of your strongest Heroes, and switch them to the other slots when they are out of Stamina.
After the first 4 hours, I heavily suggest choosing two strongest teams of heroes to use:
- 1 team is your strongest PvE Team
- 1 team of strong AoE or self-sustaining hero for pathing.
![]() Ranger Heroes (like Eironn, Lyca, etc.) are currently the best for this event.
Ranger Heroes (like Eironn, Lyca, etc.) are currently the best for this event.
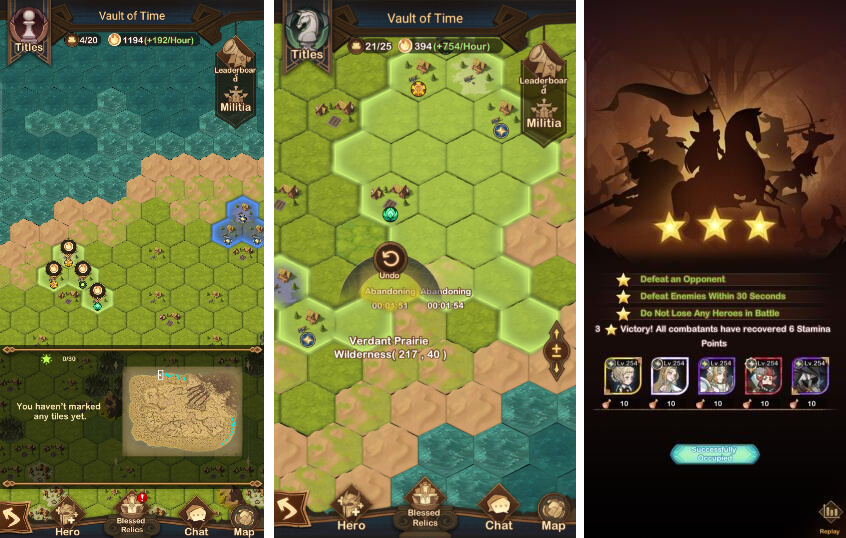
Overall ABEX Gameplay
As you’re on the map you are allowed to attack any adjacent camps, each of these camps has varying enemy heroes and tiers. Camps are scaled to a player’s power.
Attacking a camp will use up ![]() “food”, which is basically a stamina resource. Each attack uses a total of 12
“food”, which is basically a stamina resource. Each attack uses a total of 12 ![]() food per hero. However, each fight has rewards that give food back, the tasks are:
food per hero. However, each fight has rewards that give food back, the tasks are:
- Defeat an opponent.
- Defeat enemies within 30 seconds.
- Do Not Lose Any Heroes in Battle.
Food is regenerated at a rate of 4 ![]() food per hour, and at the moment there is no known cap for food.
food per hour, and at the moment there is no known cap for food.
When failing a fight, you have the option to re-battle and pay food again, with enemies energy and health staying the same as it was when the previous battle ended, you also cannot use the same heroes that lost.
Note that after 1 hour, the enemy camp recovers and the battle resets (including later camps where there is more than 1 round).
There is a max amount of territory (camps) you can occupy.
The number of camps will go up as your title grows. You are also able to abandon territories in order to claim stronger ones. This works by clicking “abandon”, and after 2 minutes they will revert back to their original state until then you can undo this option.
Note: There is what seems to be a bug on the AFK Arena test server were abandoning a camp, leaving the event tab, and going back, will cancel the timer and instantly abandon the slot.
There is no downside to owning territory besides the possibility of needing to abandon it in the future and I suggest occupying whenever possible.
Camps and Relics
All camps produce a type of resource only available for the event called ![]() “Blessed Essence” which is used to level unique traits inside the event.
“Blessed Essence” which is used to level unique traits inside the event.
There will sometimes be an option on certain camps to “Garrison” a hero. This just takes any hero from your overall hero inventory (not selected heroes) and places them inside the camp similar to a bounty board hero, this will generate you more essence than a normal camp.
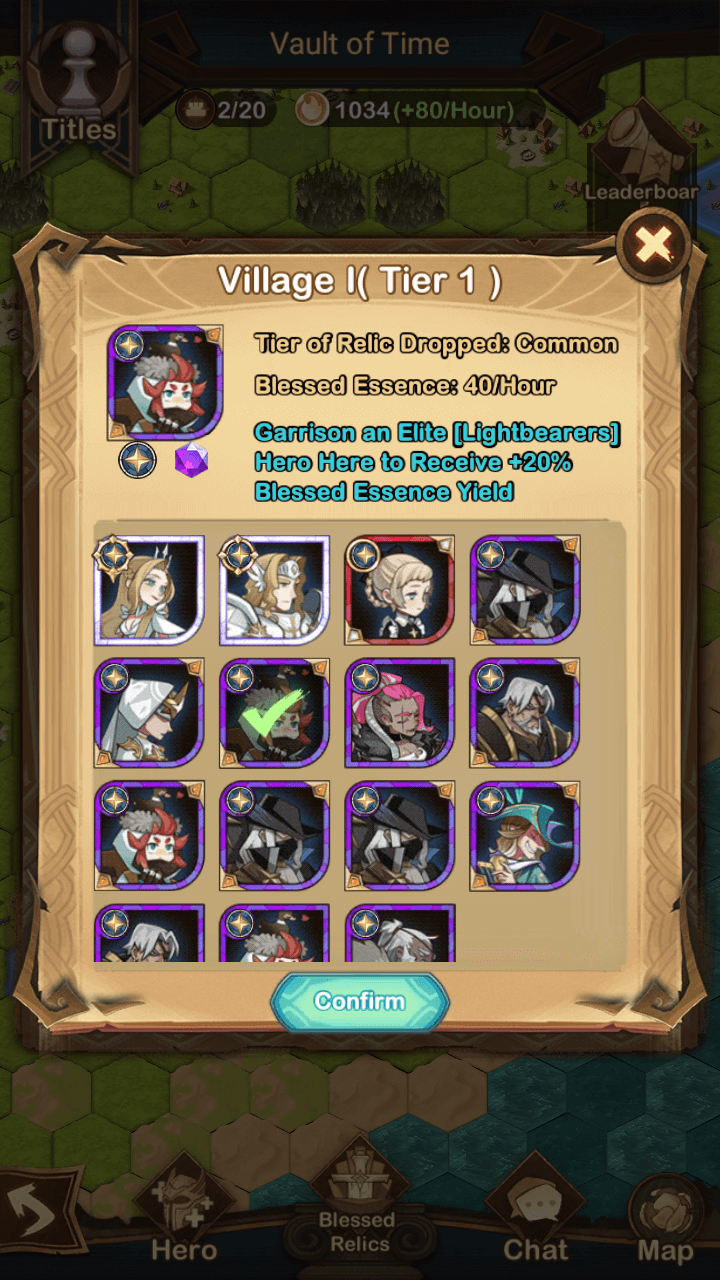
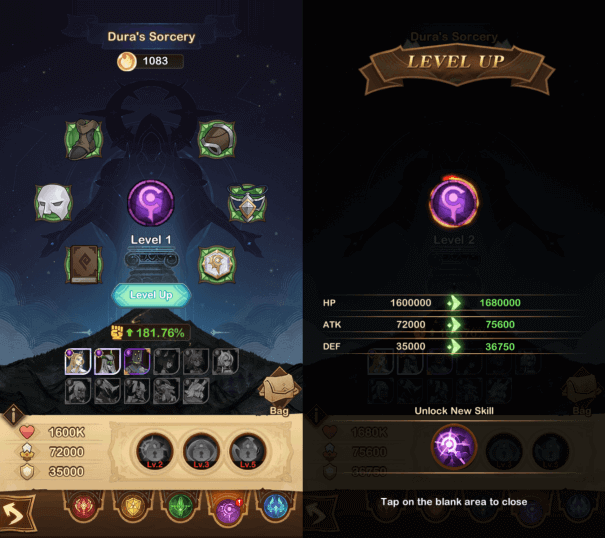
The ![]() essence is used to unlocking “relics”, which are moderate but unique stat boosts to heroes underneath an “elder tree” like structure.
essence is used to unlocking “relics”, which are moderate but unique stat boosts to heroes underneath an “elder tree” like structure.
A strategy section further on in the guide will dive deeper into this.
All camps naturally drop relics after a period of time as well, the level of relic dropped depends on the camp and the drop timers seem to be around 12 hours for the first level.
In order to unlock the special effect shown in each branch, you first need all the relics of the branch, then it automatically unlocks similar to the elder tree with leveling.
You can achieve level 2 Relics through Camps, Essence, or combining different lower Relic pieces.
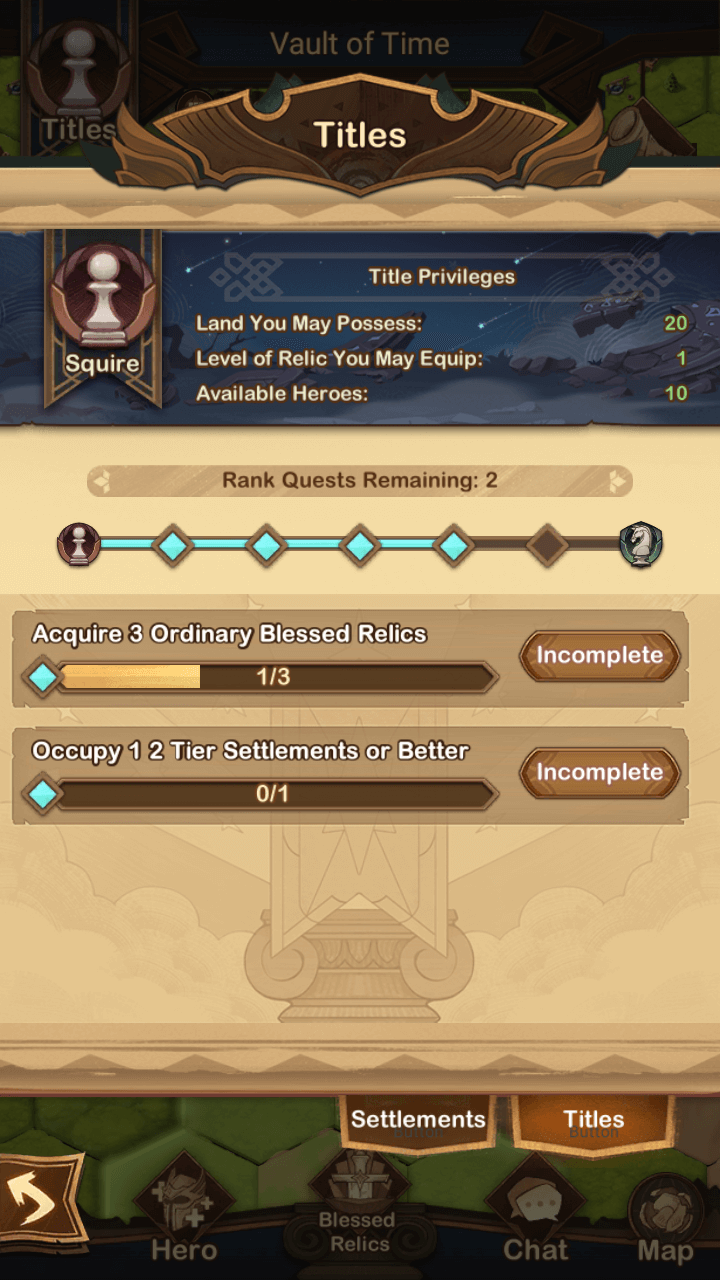
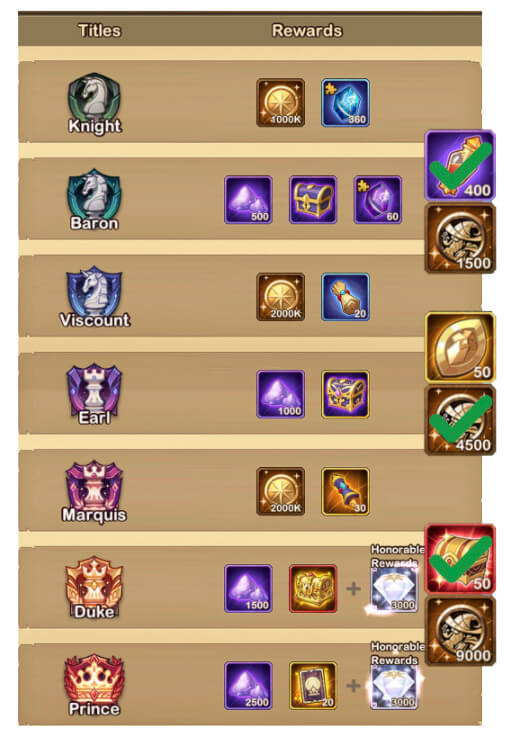
Titles
This are where the rewards and progress come in.
Titles grant you rewards upon obtaining them and give you additional traits, these benefits include extra camps available to be owned, heroes you can use, and max relic level.
There are quests that are achieved through raw gameplay for the increasing of one’s title.
Press + for more details of each title – Credits to xSkye#4210
Miscellaneous Information
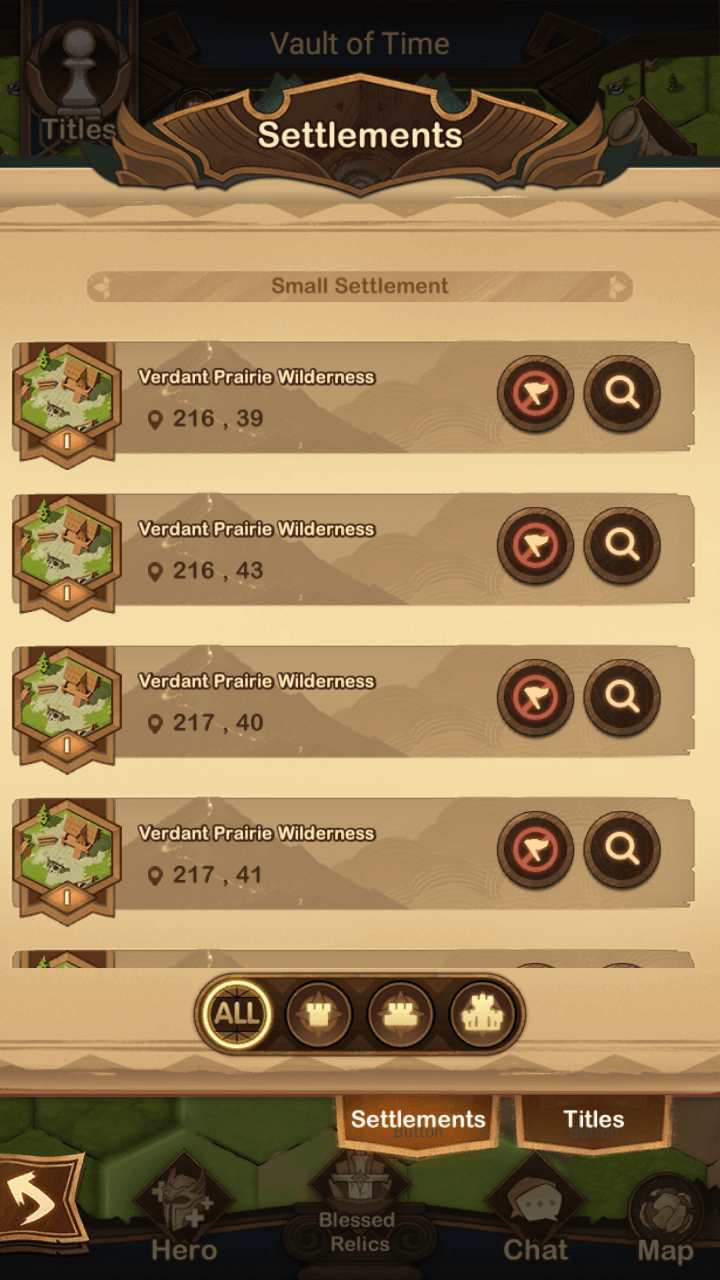
In the same tab as Titles, a “Settlements” tab shows you where all of your units are settled and the ordering they were settled in, along with coordinates.
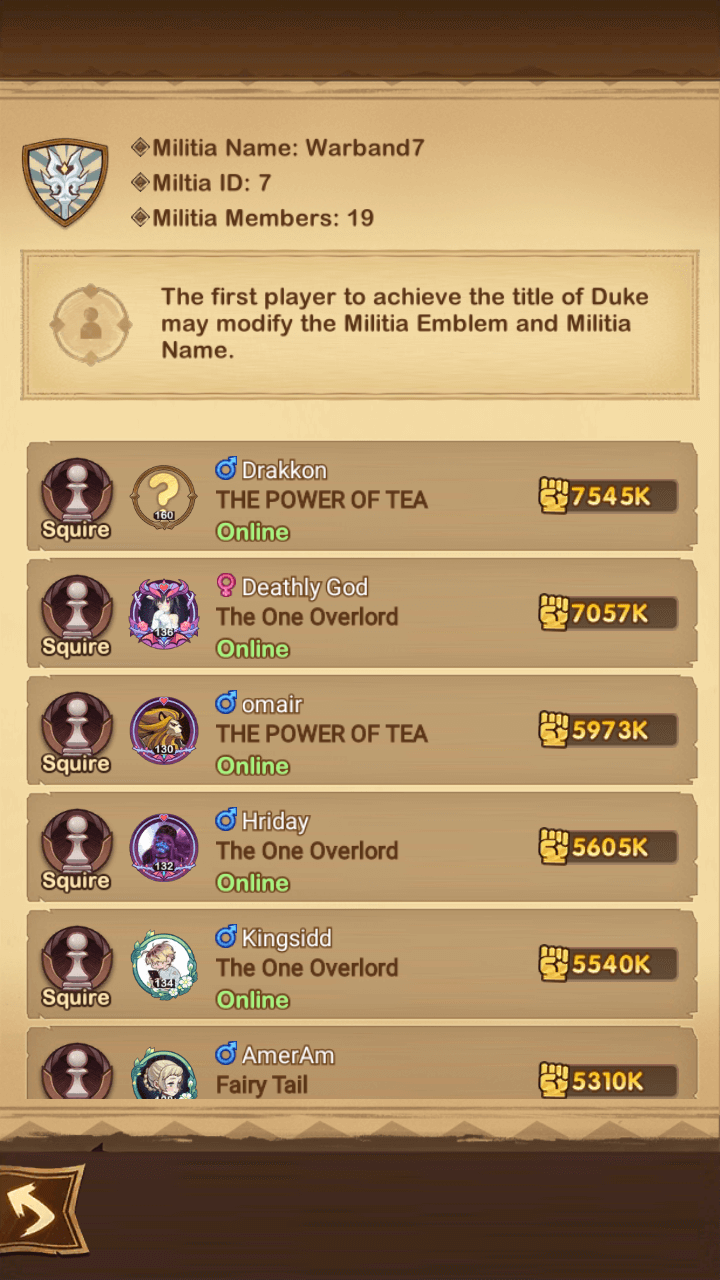
Another tab is called “Militia”, which is the name of the combined group of multiple guilds. Interestingly, the first player to reach Duke can edit the name and icon of it, it’s unsure if others get this power as well.
Map random debuffs
| Name | Description |
| Blade of Punishment | All non-Lightbearer heroes lose 50% health and are stunned for 10 seconds when attacked at the beginning of the battle and have their Attack Ratings reduced by 50%. |
| Forest’s Fury | All non-Wilder heroes lose 50% health and are stunned for 10 seconds when attacked at the beginning of the battle and have their Attack Ratings reduced by 50%. |
| Rock Bombardment | All non-Mauler heroes lose 50% health and are stunned for 10 seconds when attacked at the beginning of the battle and have their Attack Ratings reduced by 50%. |
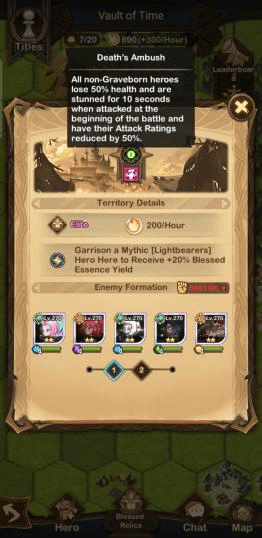
| Death’s Ambush | All non-Graveborn heroes lose 50% health and are stunned for 10 seconds when attacked at the beginning of the battle and have their Attack Ratings reduced by 50%. |
| Bolt of Wickedness | All non-Celestial, non-Hypogean and non-Dimensional heroes lose 50% health and are stunned for 10 seconds when attacked at the beginning of the battle and have their Attack Ratings reduced by 50%. |
Progression
As you move through the event you’ll fight stronger and stronger camps. These are fightable due to the obtained relics. Some of the fights may have unique restrictions, such as a debuff to heroes of a specific faction.
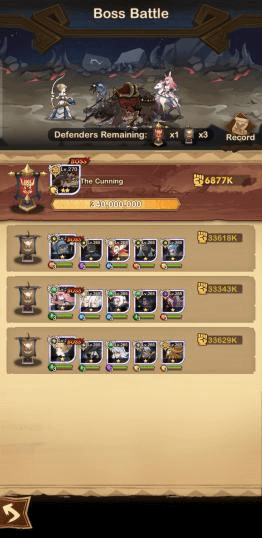
City-level camps fights will also require multiple teams, similar to boss battles from chapters 31 and above in campaign, and as a result will take up lots of food. (keep in mind before death you can pause and restart just like in the Labyrinth.)
Eventually you may even reach large stages like the one pictured on the right. This is classified as a “Territory boss.” It is unclear if the “boss” has attributes similar to those in the Solar Plane. There is a possibility these fights happen with allies as well!
The end goal is to fight Gouldos, the Lovecraftian looking creature pictured in the spoilers.
It’s unclear exactly how we get to this boss but through some data mining we can assume you must be at least Marquis in the title and move towards the right side of the map. The boss also has multiple control type abilities similar to a permanent Mehira charm, which only has one counter, which I’ll move into.

Militia Honors
Reach each new title to earn 100 point. Unlocking premium Battle Pass costs $15
1. Militia Honors shall become available during the Vault of Time event.
2. Each time a player raises their Title they shall receive Legion Merits as a reward.
3. After accumulating a certain quantity of Legion Merits, the next tier as well as its rewards will become available.
4. Unlocking the Premium Pass will
reward you with 980 VIP experience 1 points and Premium Pass rewards.
5. Militia Honors will become unavailable when the Vault of Time event ends.
6. Any Militia Honors rewards that were unlocked by the player, yet still remain unclaimed will be sent to the player’s mailbox when Island Survival ends.
Spectators – Star of Dawn
- The 10 players with the highest Combat Ratings will be displayed as Stars of Dawn. Each Star of Dawn player can be spectated by 1 other Militia member.
- All militia members may apply to become spectators.
- Spectators may only apply after enrollment ends and within the first 24 hours from when battles commence.
- Spectators cannot participate in battles, but can still receive rewards. Title rewards will become available for spectators when the Star of Dawn player they are supporting levels up.
- Each Spectator boosts overall Stamina Recover Rate for Militia members by 1.2%
- Each Spectator gives their Star of Dawn player 10% Stamina Recovery Rate.
Abyssal Expedition Rewards
The event rewards players immediately upon gaining a new title, and all rewards are obtainable without spending any money as there are no possible purchasables with abysmal exploration
There are no borders, skins, or other goodies. This seems to be a first time testing of a large scale feature. The rewards are however worth quite a bit, although it’s unsure how they scale in relation to other events that take less time to complete.
Relics List
| ID | Name | Quality | HP | ATK | DEF | HP% | ATK% | DEF% | CRIT | MSPD | CRITP | CRITD | ACC | DODGE | INSIGHT | RES | Component Relics | Coin Cost | Total Price | Sell rate |
|---|---|---|---|---|---|---|---|---|---|---|---|---|---|---|---|---|---|---|---|---|
| 1104 | The Hidden Blade | Common | 0 | 25000 | 0 | 0 | 0 | 0 | 12 | 0 | 15 | 0 | 15 | 0 | 0 | 0 | 1980 | 1980 | 0.4 | |
| 1105 | Guardsman’s Girdle | Common | 600000 | 0 | 16000 | 0 | 0 | 0 | 3 | 0 | 0 | 15 | 0 | 0 | 5 | 20 | 2880 | 2880 | 0.4 | |
| 1106 | Jewel Of Valor | Common | 400000 | 8000 | 12000 | 0 | 0 | 0 | 0 | 0 | 0 | 0 | 15 | 0 | 0 | 0 | 2100 | 2100 | 0.4 | |
| 1201 | Simple Kite Shield | Common | 500000 | 0 | 20000 | 0 | 0 | 0 | 0 | 0 | 0 | 10 | 0 | 0 | 0 | 15 | 2760 | 2760 | 0.4 | |
| 1202 | Swordplay Bracers | Common | 200000 | 15000 | 0 | 0 | 0 | 0 | 3 | 0 | 0 | 10 | 0 | 0 | 10 | 0 | 1620 | 1620 | 0.4 | |
| 1203 | Guardsmen’s Garb | Common | 500000 | 0 | 8000 | 0 | 0 | 0 | 0 | 0 | 15 | 25 | 0 | 0 | 0 | 10 | 2160 | 2160 | 0.4 | |
| 1204 | Shrine Censer | Common | 300000 | 20000 | 0 | 0 | 0 | 0 | 0 | 0 | 0 | 0 | 0 | 0 | 5 | 0 | 1680 | 1680 | 0.4 | |
| 1205 | Ruthless Chopper | Common | 0 | 15000 | 4000 | 0 | 0 | 0 | 0 | 0 | 0 | 0 | 40 | 0 | 5 | 0 | 1200 | 1200 | 0.4 | |
| 1206 | Jewel Of Determination | Common | 500000 | 4000 | 10000 | 0 | 0 | 0 | 0 | 0 | 0 | 10 | 0 | 0 | 0 | 0 | 2220 | 2220 | 0.4 | |
| 1304 | Fear Mask | Common | 400000 | 0 | 15000 | 0 | 0 | 0 | 0 | 0 | 25 | 10 | 0 | 0 | 0 | 5 | 2400 | 2400 | 0.4 | |
| 1305 | Traveler’s Boots | Common | 700000 | 0 | 10000 | 0 | 0 | 0 | 0 | 0 | 0 | 0 | 0 | 50 | 0 | 10 | 2820 | 2820 | 0.4 | |
| 1306 | Jewel Of Agility | Common | 0 | 15000 | 8000 | 0 | 0 | 0 | 0 | 0 | 0 | 20 | 0 | 0 | 0 | 5 | 1500 | 1500 | 0.4 | |
| 1404 | Oracle’s Pendant | Common | 0 | 7000 | 8000 | 0 | 0 | 0 | 0 | 0 | 10 | 0 | 0 | 25 | 0 | 0 | 1140 | 1140 | 0.4 | |
| 1405 | Book of Scholars | Common | 0 | 30000 | 2000 | 0 | 0 | 0 | 0 | 0 | 0 | 0 | 0 | 0 | 10 | 0 | 1800 | 1800 | 0.4 | |
| 1406 | Jewel Of Wisdom | Common | 300000 | 20000 | 0 | 0 | 0 | 0 | 0 | 0 | 10 | 0 | 0 | 0 | 0 | 0 | 1980 | 1980 | 0.4 | |
| 1504 | Poet’s Cup | Common | 0 | 24000 | 0 | 0 | 0 | 0 | 0 | 0 | 10 | 0 | 0 | 0 | 15 | 0 | 1560 | 1560 | 0.4 | |
| 1505 | Apprentice’s Seal | Common | 400000 | 0 | 10000 | 0 | 0 | 0 | 0 | 0 | 0 | 30 | 0 | 0 | 0 | 0 | 2160 | 2160 | 0.4 | |
| 1506 | Jewel Of Compassion | Common | 300000 | 16000 | 8000 | 0 | 0 | 0 | 0 | 0 | 0 | 0 | 0 | 20 | 0 | 0 | 2400 | 2400 | 0.4 | |
| 2104 | Regicide | Rare | 0 | 32000 | 0 | 0 | 0 | 0 | 8 | 0 | 14 | 6 | 12 | 0 | 0 | 0 | 1104, 1205, 1404 | 900 | 5220 | 0.4 |
| 2105 | Officer’s Belt | Rare | 850000 | 0 | 17000 | 0 | 0 | 0 | 0 | 0 | 0 | 16 | 0 | 0 | 20 | 24 | 1105, 1203, 1304 | 360 | 7800 | 0.4 |
| 2106 | Eye Of Valor | Rare | 600000 | 16000 | 16000 | 0 | 0 | 0 | 0 | 3 | 0 | 0 | 0 | 0 | 0 | 0 | 1106, 1106 | 1500 | 5700 | 0.4 |
| 2201 | Dark Steel Shield | Rare | 700000 | 0 | 25000 | 0 | 0 | 0 | 0 | 0 | 0 | 10 | 12 | 0 | 0 | 24 | 1201, 1203, 1505 | 120 | 7200 | 0.4 |
| 2202 | Mercenary Bracers | Rare | 250000 | 20000 | 0 | 0 | 0 | 0 | 3 | 0 | 14 | 6 | 0 | 0 | 20 | 0 | 1202, 1202 | 1680 | 4920 | 0.4 |
| 2203 | Scout’s Embrace | Rare | 700000 | 0 | 7000 | 0 | 0 | 0 | 0 | 0 | 18 | 20 | 0 | 0 | 0 | 14 | 1203, 1304 | 1140 | 5700 | 0.4 |
| 2204 | 冥思香炉 | Rare | 350000 | 40000 | 0 | 0 | 0 | 0 | 0 | 0 | 0 | 0 | 16 | 32 | 12 | 6 | 1204, 1505 | 2760 | 6600 | 0.4 |
| 2205 | Fury’s Call | Rare | 0 | 30000 | 8000 | 0 | 0 | 0 | 0 | 0 | 10 | 0 | 44 | 0 | 12 | 0 | 1205, 1104 | 2040 | 5220 | 0.4 |
| 2206 | Eye Of Determination | Rare | 700000 | 14000 | 10000 | 0 | 0 | 0 | 0 | 3 | 0 | 6 | 0 | 0 | 0 | 0 | 1206, 1206 | 1380 | 5820 | 0.4 |
| 2304 | Confessor’s Mask | Rare | 650000 | 0 | 15000 | 0 | 0 | 0 | 0 | 0 | 18 | 22 | 0 | 0 | 0 | 13 | 1304, 1505 | 2040 | 6600 | 0.4 |
| 2305 | Cavalry Boots | Rare | 1000000 | 0 | 10000 | 0 | 0 | 0 | 0 | 0 | 0 | 4 | 0 | 40 | 10 | 25 | 1305, 1404 | 3240 | 7200 | 0.4 |
| 2306 | Eye Of Agility | Rare | 0 | 32000 | 10000 | 0 | 0 | 0 | 0 | 3 | 0 | 10 | 0 | 0 | 10 | 0 | 1306, 1306 | 1860 | 4860 | 0.4 |
| 2404 | Oath of the Setting Sun | Rare | 0 | 20000 | 10000 | 0 | 0 | 0 | 0 | 0 | 5 | 0 | 0 | 32 | 0 | 0 | 1404, 1404, 1404 | 540 | 3960 | 0.4 |
| 2405 | Book of Runes | Rare | 0 | 60000 | 6000 | 0 | 0 | 0 | 0 | 0 | 0 | 0 | 0 | 0 | 14 | 6 | 1405, 1405, 1504 | 1440 | 6600 | 0.4 |
| 2406 | Eye Of Wisdom | Rare | 350000 | 30000 | 0 | 0 | 0 | 0 | 2 | 0 | 5 | 10 | 0 | 0 | 0 | 0 | 1406, 1406 | 1320 | 5280 | 0.4 |
| 2504 | Chalice of Light | Rare | 0 | 50000 | 0 | 0 | 0 | 0 | 0 | 0 | 23 | 0 | 0 | 0 | 14 | 8 | 1504, 1504, 1405 | 1680 | 6600 | 0.4 |
| 2505 | Sunwalker Seal | Rare | 550000 | 0 | 14000 | 0 | 0 | 0 | 0 | 0 | 0 | 32 | 0 | 0 | 0 | 11 | 1505, 1404, 1204 | 1020 | 6000 | 0.4 |
| 2506 | Eye Of Compassion | Rare | 500000 | 28000 | 8000 | 0 | 0 | 0 | 0 | 0 | 0 | 0 | 0 | 0 | 0 | 0 | 1506, 1506 | 1020 | 5820 | 0.4 |
| 3104 | Blitz Arc | Elite | 0 | 50000 | 0 | 0 | 0 | 0 | 5 | 0 | 16 | 8 | 24 | 0 | 0 | 0 | 2104, 2205 | 3360 | 13800 | 0.4 |
| 3105 | Immortal’s Cinctures | Elite | 1600000 | 0 | 30000 | 0 | 0 | 0 | 0 | 0 | 0 | 18 | 0 | 0 | 24 | 28 | 2105, 2202, 2505 | 4080 | 22800 | 0.4 |
| 3106 | Valor’s Core | Elite | 900000 | 33000 | 30000 | 0 | 0 | 0 | 0 | 0 | 0 | 0 | 0 | 0 | 0 | 0 | 2106, 2106 | 2400 | 13800 | 0.4 |
| 3201 | The Wall | Elite | 1300000 | 0 | 44000 | 0 | 0 | 0 | 0 | 0 | 0 | 12 | 24 | 0 | 0 | 28 | 2201, 2201, 2203 | 1500 | 21600 | 0.4 |
| 3202 | Arena Bracers | Elite | 500000 | 26000 | 0 | 0 | 0 | 0 | 3 | 0 | 16 | 8 | 0 | 0 | 24 | 0 | 2202, 2204 | 2880 | 14400 | 0.4 |
| 3203 | Body of Grace | Elite | 1300000 | 0 | 12000 | 0 | 0 | 0 | 0 | 0 | 20 | 22 | 0 | 0 | 0 | 18 | 2203, 2201, 1201 | 1740 | 17400 | 0.4 |
| 3204 | Cathedral Censer | Elite | 700000 | 80000 | 0 | 0 | 0 | 0 | 0 | 0 | 0 | 0 | 28 | 50 | 16 | 10 | 2204, 2505 | 10800 | 23400 | 0.4 |
| 3205 | Noble Blade | Elite | 0 | 50000 | 14000 | 0 | 0 | 0 | 0 | 0 | 12 | 0 | 56 | 0 | 16 | 0 | 2205, 2104 | 5760 | 16200 | 0.4 |
| 3206 | Determination’s Core | Elite | 1100000 | 30000 | 20000 | 0 | 0 | 0 | 0 | 0 | 0 | 6 | 0 | 0 | 0 | 0 | 2206, 2206 | 2160 | 13800 | 0.4 |
| 3304 | Veil of Silence | Elite | 1100000 | 0 | 29000 | 0 | 0 | 0 | 0 | 0 | 20 | 24 | 0 | 0 | 0 | 17 | 2304, 2203, 2404 | 2340 | 18600 | 0.4 |
| 3305 | Rambler’s Boots | Elite | 1800000 | 0 | 20000 | 0 | 0 | 0 | 0 | 0 | 0 | 6 | 0 | 58 | 14 | 29 | 2305, 2505 | 9600 | 22800 | 0.4 |
| 3306 | Agility’s Core | Elite | 0 | 60000 | 15000 | 0 | 0 | 0 | 0 | 0 | 0 | 10 | 0 | 0 | 10 | 0 | 2306, 2306 | 2280 | 12000 | 0.4 |
| 3404 | Immortal’s Crown | Elite | 0 | 40000 | 15000 | 0 | 0 | 0 | 0 | 0 | 7 | 0 | 0 | 50 | 0 | 0 | 2404, 2404, 2404 | 1320 | 13200 | 0.4 |
| 3405 | Admonition | Elite | 0 | 100000 | 10000 | 0 | 0 | 0 | 0 | 0 | 0 | 0 | 0 | 0 | 18 | 10 | 2405, 2406 | 6120 | 18000 | 0.4 |
| 3406 | Wisdom’s Core | Elite | 600000 | 67000 | 0 | 0 | 0 | 0 | 1 | 0 | 5 | 10 | 0 | 0 | 0 | 0 | 2406, 2406 | 5040 | 15600 | 0.4 |
| 3504 | Kuilin Ring | Elite | 0 | 90000 | 0 | 0 | 0 | 0 | 0 | 0 | 25 | 0 | 0 | 0 | 18 | 12 | 2504, 2405, 1504 | 4440 | 19200 | 0.4 |
| 3505 | Saint’s Signet | Elite | 1000000 | 0 | 25000 | 0 | 0 | 0 | 0 | 0 | 0 | 34 | 0 | 0 | 0 | 15 | 2505, 2105 | 4200 | 18000 | 0.4 |
| 3506 | Compassion’s Core | Elite | 800000 | 55000 | 16000 | 0 | 0 | 0 | 0 | 0 | 0 | 0 | 0 | 0 | 0 | 0 | 2506, 2506 | 3960 | 15600 | 0.4 |
| 4104 | Cloud Piercer | Legendary | 0 | 0 | 0 | 0 | 19 | 0 | 4 | 0 | 20 | 12 | 38 | 0 | 0 | 0 | 3104, 3205, 3404 | 3600 | 46800 | 0.4 |
| 4105 | Everlasting Resolve | Legendary | 0 | 0 | 0 | 28 | 0 | 30 | 0 | 0 | 0 | 22 | 0 | 0 | 28 | 32 | 3105, 3202, 3505, 3305 | 12000 | 90000 | 0.4 |
| 4106 | Heart Of Valor | Legendary | 0 | 0 | 0 | 13 | 17 | 25 | 0 | 7 | 0 | 0 | 0 | 0 | 0 | 0 | 3106, 3106, 3106 | 24600 | 66000 | 0.4 |
| 4201 | The Bastion | Legendary | 0 | 0 | 0 | 22 | 0 | 40 | 0 | 0 | 0 | 16 | 38 | 0 | 0 | 32 | 3201, 3201, 3203, 3203 | 12000 | 90000 | 0.4 |
| 4202 | The Imperishable | Legendary | 0 | 0 | 0 | 9 | 12 | 0 | 2 | 0 | 20 | 12 | 0 | 0 | 28 | 0 | 3202, 3204 | 15000 | 52800 | 0.4 |
| 4203 | Radiance of the Apostle | Legendary | 0 | 0 | 0 | 22 | 0 | 12 | 0 | 0 | 24 | 26 | 0 | 0 | 0 | 22 | 3203, 3201, 2201, 3203 | 2400 | 66000 | 0.4 |
| 4204 | Basilica Censer | Legendary | 0 | 0 | 0 | 12 | 36 | 0 | 0 | 0 | 0 | 0 | 42 | 71 | 20 | 14 | 3204, 3505, 3204 | 31200 | 96000 | 0.4 |
| 4205 | Eternal Warrior | Legendary | 0 | 0 | 0 | 0 | 19 | 10 | 0 | 0 | 16 | 0 | 70 | 0 | 20 | 0 | 3205, 3104, 3404 | 12600 | 55800 | 0.4 |
| 4206 | Heart Of Determination | Legendary | 0 | 0 | 0 | 16 | 13 | 18 | 0 | 3 | 0 | 6 | 0 | 0 | 0 | 0 | 3206, 3206, 3206 | 24600 | 66000 | 0.4 |
| 4304 | Hushed Veil | Legendary | 0 | 0 | 0 | 18 | 0 | 23 | 0 | 0 | 24 | 28 | 0 | 0 | 0 | 21 | 3304, 3203, 3404 | 16800 | 66000 | 0.4 |
| 4305 | Dawn Striders | Legendary | 0 | 0 | 0 | 31 | 0 | 18 | 0 | 0 | 0 | 10 | 0 | 79 | 18 | 33 | 3305, 3505, 3304 | 30600 | 90000 | 0.4 |
| 4306 | Heart Of Agility | Legendary | 0 | 0 | 0 | 0 | 29 | 20 | 0 | 7 | 0 | 10 | 0 | 0 | 10 | 0 | 3306, 3306, 3306 | 36000 | 72000 | 0.4 |
| 4404 | Crown of the Monarch | Legendary | 0 | 0 | 0 | 0 | 18 | 13 | 0 | 0 | 11 | 0 | 0 | 71 | 0 | 0 | 3404, 3404, 3504 | 10200 | 55800 | 0.4 |
| 4405 | Divinity’s Axiom | Legendary | 0 | 0 | 0 | 0 | 39 | 9 | 0 | 0 | 0 | 0 | 0 | 0 | 22 | 14 | 3405, 3406, 3204 | 15000 | 72000 | 0.4 |
| 4406 | Heart Of Wisdom | Legendary | 0 | 0 | 0 | 9 | 28 | 0 | 1 | 0 | 5 | 10 | 0 | 0 | 0 | 0 | 3406, 3406, 3406 | 25200 | 72000 | 0.4 |
| 4504 | Mark of Compassion | Legendary | 0 | 0 | 0 | 0 | 35 | 0 | 0 | 0 | 29 | 0 | 0 | 0 | 22 | 16 | 3504, 3405, 2504, 3104 | 17400 | 75000 | 0.4 |
| 4505 | Star-sight | Legendary | 0 | 0 | 0 | 19 | 0 | 25 | 0 | 0 | 0 | 38 | 0 | 0 | 0 | 19 | 3505, 3105, 3305 | 17400 | 81000 | 0.4 |
| 4506 | Heart Of Compassion | Legendary | 0 | 0 | 0 | 10 | 23 | 13 | 0 | 0 | 0 | 0 | 0 | 0 | 0 | 0 | 3506, 3506, 3506 | 25200 | 72000 | 0.4 |
| 5104 | Mercy and Malice | Mythic | 0 | 0 | 0 | 0 | 40 | 0 | 3 | 0 | 14 | 6 | 12 | 0 | 0 | 0 | 4104, 4205, 4404 | 21600 | 180000 | 0.4 |
| 5105 | The Austere Resolve | Mythic | 0 | 0 | 0 | 46 | 0 | 55 | 0 | 0 | 0 | 16 | 0 | 0 | 14 | 18 | 4105, 4202, 4505, 4305 | 58200 | 372000 | 0.4 |
| 5106 | Star Of Valor | Mythic | 0 | 0 | 0 | 26 | 42 | 45 | 0 | 0 | 0 | 0 | 0 | 0 | 0 | 0 | 4106, 4106, 4106 | 156000 | 354000 | 0.4 |
| 5201 | Hero’s Vow | Mythic | 0 | 0 | 0 | 36 | 0 | 74 | 0 | 0 | 0 | 10 | 12 | 0 | 0 | 18 | 4201, 4201, 4203, 4203 | 48000 | 360000 | 0.4 |
| 5202 | Horn Of Defiance | Mythic | 0 | 0 | 0 | 18 | 24 | 0 | 0 | 0 | 14 | 6 | 0 | 0 | 14 | 0 | 4202, 4204 | 61200 | 210000 | 0.4 |
| 5203 | Light’s Hope | Mythic | 0 | 0 | 0 | 44 | 0 | 20 | 0 | 0 | 18 | 20 | 0 | 0 | 0 | 8 | 4203, 4201, 3201, 4203 | 50400 | 294000 | 0.4 |
| 5204 | Master’s Claw | Mythic | 0 | 0 | 0 | 18 | 38 | 0 | 0 | 0 | 0 | 0 | 16 | 32 | 6 | 0 | 4204, 4505 | 75000 | 252000 | 0.4 |
| 5205 | Diligence | Mythic | 0 | 0 | 0 | 0 | 43 | 20 | 0 | 0 | 10 | 0 | 44 | 0 | 6 | 0 | 4205, 4104, 4404 | 69600 | 228000 | 0.4 |
| 5206 | Star Of Determination | Mythic | 0 | 0 | 0 | 27 | 38 | 30 | 1 | 0 | 0 | 6 | 0 | 0 | 0 | 0 | 4206, 4206, 4206 | 132000 | 330000 | 0.4 |
| 5304 | Conquest Eternal | Mythic | 0 | 0 | 0 | 32 | 0 | 40 | 0 | 0 | 18 | 22 | 0 | 0 | 0 | 7 | 4304, 4203, 4404 | 100200 | 288000 | 0.4 |
| 5305 | Legacy of the Fallen | Mythic | 0 | 0 | 0 | 59 | 0 | 30 | 0 | 0 | 0 | 4 | 0 | 40 | 4 | 19 | 4305, 4505, 4304 | 159000 | 396000 | 0.4 |
| 5306 | Star Of Agility | Mythic | 0 | 0 | 0 | 0 | 62 | 35 | 0 | 0 | 0 | 10 | 0 | 0 | 10 | 0 | 4306, 4306, 4306 | 114000 | 330000 | 0.4 |
| 5404 | Light’s Truth | Mythic | 0 | 0 | 0 | 0 | 28 | 30 | 0 | 0 | 5 | 0 | 0 | 32 | 0 | 0 | 4404, 4504, 4205 | 5400 | 192000 | 0.4 |
| 5405 | Wizard’s Spire | Mythic | 0 | 0 | 0 | 0 | 69 | 20 | 3 | 0 | 0 | 0 | 0 | 0 | 8 | 0 | 4405, 4204, 4204 | 36000 | 300000 | 0.4 |
| 5406 | Star Of Wisdom | Mythic | 0 | 0 | 0 | 12 | 54 | 0 | 0 | 0 | 5 | 10 | 0 | 0 | 0 | 0 | 4406, 4406, 4406 | 96000 | 312000 | 0.4 |
| 5504 | Heirloom Of Time | Mythic | 0 | 0 | 0 | 0 | 61 | 0 | 0 | 0 | 23 | 0 | 0 | 0 | 8 | 2 | 4504, 4405, 3504, 4104 | 51000 | 264000 | 0.4 |
| 5505 | Sacred Grail | Mythic | 0 | 0 | 0 | 26 | 0 | 35 | 0 | 0 | 0 | 32 | 0 | 0 | 0 | 5 | 4505, 4105, 4305 | 9000 | 270000 | 0.4 |
| 5506 | Star Of Compassion | Mythic | 0 | 0 | 0 | 21 | 47 | 29 | 0 | 0 | 0 | 0 | 0 | 0 | 0 | 0 | 4506, 4506, 4506 | 132000 | 348000 | 0.4 |
Credits to xSkye#4210
The Abyssal Expedition (Vault of Time) event is long-term progress, and will not finish within a few days. Once more information is out I will add it to this guide.
If there are any questions please ask me and I’ll try to figure out the answer if I do not already know it.
Thanks to you for your time and good luck with the Abyssal Expedition event!